
Activating eService
Click the Options tab.
From the drop down, select the store and branch that will be added to eService.
Check Activate e-Service
Enter a Unique Web Name; for example, sunshinemotors, and click Validate. (“Do you wish to Validate and Save the Unique Web Name?”, click Yes)
Choose a default Language
Choose a default Time Zone
From Email: select the email address which will appear as the "from" address in the customer's confirmation emails.
Email Online Requests - choose any user to send an email to for every online request that comes in from eService, user can be added to this list in User Access, after they have been added they will display in the list for selection.
Info popup “Do you wish to Validate and Save the Unique Web Name?”, click Yes.
The URL is created, for example: https://prod.dealermine.net/eservice2webapp/eservice/profile.aspx?dealer=sunshinemotors
To change the colour display in eService, select one of the many Themes from the drop down. (for example, Red & Black, Blue and Grey, Red and White)
Additional Options
Integrated Booking Options
Integrated Stores have two options for booking appointments:
Push Directly to DMS
The appointment information is transferred from eService and pushed directly into the DMS. It populates the eService >Confirmed tab and the Appointment Schedule. This option is not recommended.
If it's a new booking and no VIN was used the appointment may fail when being pushed and end up in the eService > Unconfirmed tab to be finalized by an Appointment Coordinator.
2. Do Not Push Directly to DMS (manage and push all appointments manually in DealerMine)
The appointment information is transferred from eService and is pushed into Dealermine.
It populates the eService-> Unconfirmed tab.
An Appointment Coordinator must validate the information, and then click Continue at the bottom of the validation form.
On the Profile screen double click the Appt Draft icon next to the VIN and finalize the appointment booking which will then be pushed to the DMS and appear in the Appointment Schedule.
Non-Integrated Booking Options
The appointment information is transferred from the eService into Dealermine.
It populates the eService-> Unconfirmed tab.
An Appointment Coordinator must validate the information from these tabs, Recycle the customer then manually book all appointments in the DMS.
All appointments booked in the DMS will go into the "Confirmed" tab within the eService tab after the next daily download runs.
1. Automatically link incoming appointments with a matching customer file in DealerMine based on the email address.
The system can match the customer to a file based on email. This process will help match customers to a file elevating the amount of unknown VINS and new customer files in the system.
If there are two customer's with the same email address, then the system does a check against the VIN and the year, make model of the vehicle and does the match according to which file has the same vehicle.
If both files contain the same email address and same VIN, then the system selects the file based on the most recent service history.
2. Reduce number of slots available by ___ to prevent overbooking.
To avoid overbooking, select a number to reduce the number of available appointment slots; for example, if there's 4 appointment slots on the appointment schedule you can reduce it in eService and only show 1, 2 or 3 based on the number you choose to reduce by.
3. Prevent same day bookings: if this option is checked then users booking online after 12am will not be able to book for the same day.
4. Limit customers booking after a certain time for the next business day, to only see available appointment times after the specified time. Ie. Limit customers booking after 8:00pm for the next business day to only see available appointment times after 12:00pm.
5. Display Appointment Preference Options: Drop Off, Waiter, Loaner and Shuttle (if not, then Drop Off is assumed)
If this option is checked off the dealership must Setup Waiter Schedule per day and Setup # of Loaner Vehicles per day
Shuttle is now displaying as an option in "Display Appointment Preference Options" for eService.
6. Address Required: (Only visible for ADP dealerships)
For ADP stores where an address is required to create a customer file, the Dealership must check the option Address Required. Once this option is selected, a customer will see the fields for entering their address on the eService registration form, and upon completion of the form, a customer file will be created.
Click Save.
7. Display "Type my Service Request Myself" comment box
This will be checked by default and visible to all customers booking online. Turn this option on if you do not want to allow your customers to type services in a comment box and would rather force them to choose services from the recommended service list.
8. Display Comment Box
If this is checked a comment box will appear near the end of booking.
8. Display On-Screen confirmation number when booking is done
9. Display Advisor Selection
10. Appt Dates Displayed
In the past when scheduling an appointment on eService the customer could only schedule 40 days out. Now you can select how many days out an appointment can be scheduled in eService. The Appt Dates Displayed drop down will default to 40 and goes to 365.

Version 5.9.2 - Released March 4, 2016
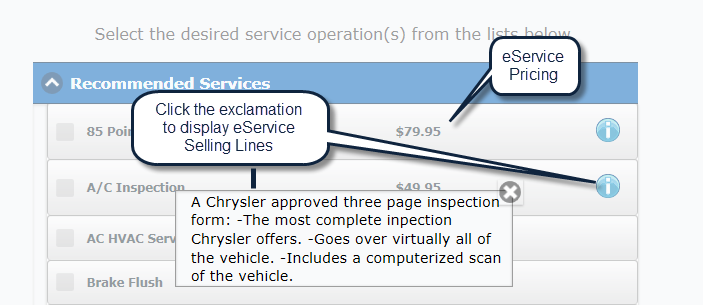
11. Display Pricing - when the Display Pricing check box is checked the pricing for services will display to the customer when booking an appointment through eService. In Maintenance Configuration - Description & Pricing the Admin User with access can set the eService Price per maintenance item. If Specific Pricing exists on the selected maintenance Group DealerMine will then use that price first and then go to eService Pricing.
*Copy and paste the URL into the address bar, and you are forwarded to the Dealership's eService site.
Version 5.9.1 - Released Jan 14, 2016
Editing the Message Bar - the message that displays in the "Book Appt Button Label" on the Eservice Configuration screen in the Options tab, will now also display on the Message Bar for each Eservice screen. The user will need to have access to turn this on in e-Service Configuration which can be given in User Access.