Service & Showroom CRM
Enhancements
1. Social
We have added a Follow button a to the Twitter slide in section on the Profile screen. This will allow the user to Follow, Unfollow and show if Following without having to go to the Social Tab to see this information.
We have also added a "Schedule a Followup" button to the Social screen next to the reply, retweet and favorite buttons, which will allow you to schedule a followup for the customer. This option is only available when the Social customer has been linked to a customer profile in DealerMine.
We have also added the ability to Raise an Issue on any Social lead that again has been linked to a DealerMine customer profile. The issue type will be marked as "Social" and the tweet comments will be automatically entered into the comments box. Users must have access to raise issues in order to take advantage of this feature.
Social Notifications can now be setup to email or text any user with access to tweet on behalf of the dealership when any new social leads come into DealerMine. Notifications can be setup for a minimum lead score. Ie. 75 would only notify users when hot leads come in greater than or equal to 75.
2. Unsubscribe Webpage (Multi-lingual)
We have made a change whereby a user can convert the unsubscribe message appended to emails from English to French. When on the Profile screen a user can simply go into the Customer Information screen and set the language from English to French, then when sending an email (regular, Batch or Campaigns) the Unsubscribe URL and Unsubscribe page will show in French.
3. Email
On the Email tab when a user right clicks on an email and chooses "View Cust Profile" we will display a popup "Customer To View" letting the user know that the email address is on more then one customer file. The popup will list the customer files that have the same email address, and also display the Cust No, Customer Name, Last Email Sent Date, and Subject line making it easier for the user to identify the correct customer file, when clicking on one of the files the user will be directed to the customer file.
4. Notifications (service/showroom leads)
We have added a new feature in Admin Screen > User Setup > User Info > "Select Types of Notifications", when a Internet lead or Text message for Service or Showroom is sent after hours to a Dealership, based on the operational hours set we will send a notification to the user's cell phone either by Email or Text notifying them a Lead has come in. Notifications will only go to a Service BDC user if they are the assignee of the lead if notifications are turned on. If you have all your leads set to "unassigned" then only Managers will receive a notification. If you have an assignee or have it set to round robin the appropriate user will be notified.
In Email Setup > I-Leads we have added a new option to set alert notifications for any lead source. Specify a number of mins between 1-60 and choose any user from the list to send an alert to if this lead has not been taken care of in that amount of time. On our next release we will be changing the minutes to be in ranges, starting from 5-9, 10-11 so on and so forth.
You can also choose to reassign the lead if it's not actioned in the specified number of minutes. This option is only available if the lead has a default assignee or is set to round robin.
5. AC Benchmarks (granting access)
As requested we have added the ability to grant access to the AC Benchmarks, by going into User Setup > User Access > Admin Screen > AC Benchmarks and grant a user access by placing a check in the Allow Access check box beside AC Benchmarks.
Service CRM
Enhancements
1. Fetch Changes
We have added a new Fetch Query where a user is able to create a Fetch for Recall Number/Name using HasRecallName("Recall Name") or HasRecallNo("Recall No") using the Source "Customer Vehicles".
We have made a change in Fetch Campaigns whereby a user is now able to change an expiry date on an existing fetch campaign without losing or deleting any of the contact information. This can be done in the Campaigns screen by clicking on the Schedule icon in the Expiry Date column on the Campaigns grid.
DealerMine has added the ability via it's "Import Management" utility to import a "comma, semi-colon, tab, pipe" delimited CSV.
2. Book Appt Form (searching Opcodes)
We have added two new Radio buttons to the Book Appt Form > Operation Details popup screen whereby a user now can search by part Opcode by clicking on either "Contains" (user can search by inputting in the Opcode search box numbers or letters that they know to be in an Opcode and the system will search and bring up all Opcodes with those numbers or letters entered). When clicking on "Starts With" (the user can enter in numbers or letters in the Opcode search box that an Opcode starts with and the system will search and bring up all the Opcode that start with the numbers or letters that the user entered).
We have added a new notification popup to the Book Appt to help eliminate over booking in the shop. When a user books an appointment and the estimated time of the appointment exceeds the shop hours, the user will now receive a notification stating "The estimated completion time will be past the end of the day. Continue?" the user will then have the option of clicking Yes and continue to book the appointment or clicking No and then choosing a different day to book the appointment.
3. Block Times
We have made a small change to Skill View Setup > Block Times, Advisor Setup > Work Schedule, > Team Setup > Block Times and Technician Setup > Work Schedules. Now when Adding or Editing a Rule on any of these four screens the Frequency drop down choices are set to Weekly or Daily only.
4. eService
We have made a small change in eService, now when the "Display Advisor Selection" is turned on and a customer is booking an appointment in eService the Advisor option will show after the date is selected. This will ensure we display the correct available times for the Advisor based on the date selected.
We have created an option in eService Configuration to show or hide the comment boxes during the online booking process. This was requested to eliminate customers from entering their desired appointment date and time when it was not available for selection. Comment boxes are on by default and must be turned off per dealership if the need to hide them is preferred.
On the eService report we have added a column to track device detection. This will help to see if your online users are typically booking on phones or desktop computers.
5. Open Indicator (PreBooked Appt)
We have added a function to Contact Selections > Scheduled Maintenance "Ignore Appointments that were booked more then () days(s)ago". If a user books an appointment for a value >/= to the number set in the "Ignore Appointments that were booked more then () days(s)ago" then when opening the Open Appt Indicator on the Profile screen we will display the Booked Date in Red and an icon. When hovering over the icon we will display a popup message "Pre-booked Appt" indicating that this appt was booked more than the specified number of days ago. This feature is meant to help differentiate recently booked appointments from appointments that were booked quite some time ago. Note: that the default for "Ignore Appointments that were booked more then () days(s)ago" will be 720 days until another value is entered/saved.
6. OpCode Utilization (assign CWI to OpCodes)
We have added the ability within Store Setup > Maintenance Configuration > OpCode Utilizations whereby a user can now assign a specified "CWI" to an OpCode by simply clicking on the OpCode to highlight then click on Options > Edit Opcode, the user can choose a CWI from the drop down list and click on Save, the new selection will show on the grid under CWI.
7. Set up Screens for Advisor/Tech/Team
We have made a change to the Setup Screen for Advisor/Tech/Team, now when going into Advisor Setup, Team Setup and Technician Setup and Adding/Editing a Rule we will now display the name of the person that made the change along with the date and time on the grid. This info will display under the columns "Last Modified By", and "Last Modified Date" and will update each time an edit is made.
8. DealerBuilt (Lightyear)
Turn off Integration - As requested, DealerMine has now implemented "Turn Off Integration" with DealerBuilt (LightYear) from within DealerMine's Customer Information > Contact Methods (Customer Specific) > One-to-One Contacts (e.g. Home Phone, Work Phone, Cell Phone - Letter, Email, Text). Once altered, these changes will be immediately reflected within LightYear and DealerMine's Customer Information > Contact Methods (Customer Specific) > DMS Contacts. Please note., to turn off "Phone" within LightYear., you must turn off "Home Phone, Work Phone, Cell Phone" within DealerMine.
Appointment Status - As requested, DealerMine now recognizes DealerBuilt (LightYear) Appointment Status'., removing Appointments based upon the Status of Cancelled, Deleted, Postponed, Unconfirmed/Future.
9. Maintenance Configuration (Schedule Stats)
DealerMine has now added the ability under the Admin Screen > Store Setup > Maintenance Configuration (Schedule Stats) to re-assign vehicle(s) deemed as "Not Linked to Schedule"., users can multi-select VINs via "Check to Assign a Schedule" and select a corresponding Schedule Group. Once saved, the "Not Linked to Schedule" Count / % will automatically re-adjust, as those selected VINs are removed from the list.
Showroom CRM
Enhancements
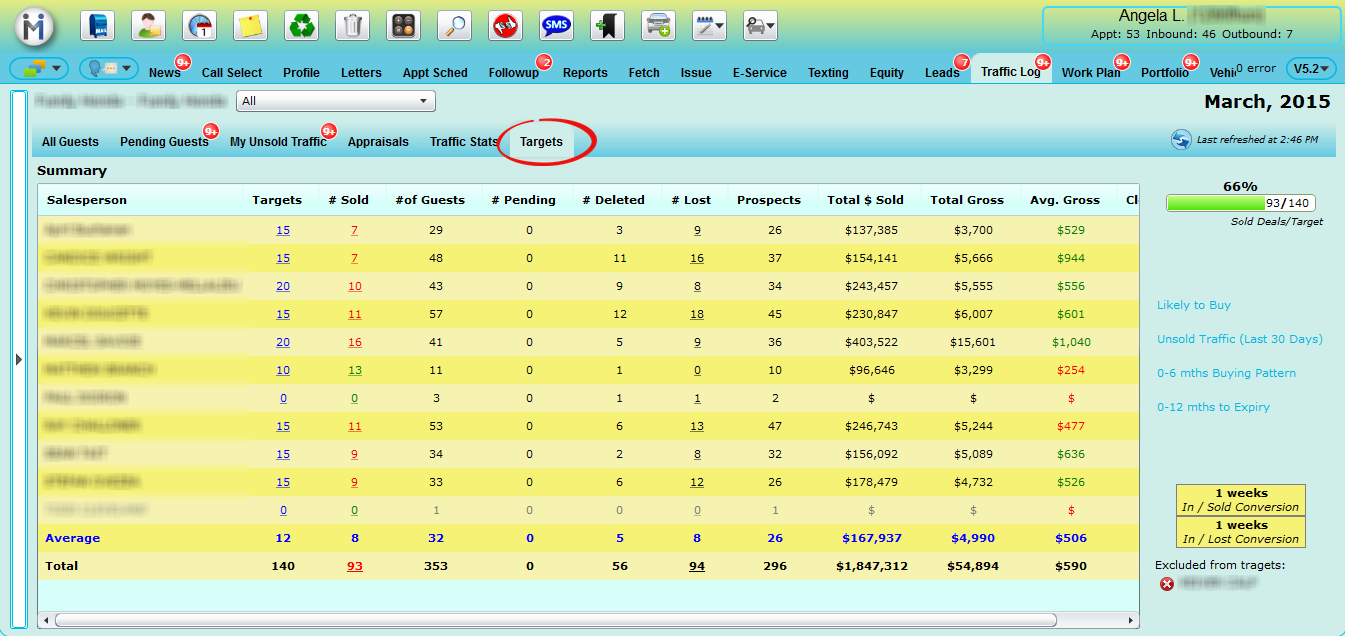
1. Traffic Log - Targets Screen
We have created a new Targets screen found within the Traffic Log, that will track sold deals monthly for each Salesperson, as well as other key performance indicators. The Targets column will show in Blue, the Average line will show in blue and the Total line will show in Black Bold. If the Salesperson has achieved or exceeded their targetthe # Sold column will show in Green, and will show in Red if below the target set. The Average Gross column will show in Green if the Salesperson has achieved or exceeded the Average line and will show in Red if the Average Gross falls below the Average line.
Click the blue Target to enter any specific target for each Salesperson on any month
Click the # Sold (whether it's green or red) to view a list of sold customers pulled over from F and I.
Exclude any Salesperson or Sales Manager, Sales BDC by right clicking on their name and choosing "Exclude from Target". Averages will re-adjust and excluded users will be displayed in the bottom right to be put back in at any time.
Inactive Salespeople will appear in the grid in grey italicized font.... showing they have some activity but have since been made inactive in user setup. These users can also be excluded from any month.
Choose any Salesperson's name from the list at the top of the screen to view just their information for a one-on-one session, to view their Sold Deals/Target and quick links for sales opportunities.
This screen provides Salespeople with quick links to other selling opportunities such as Likely to Buy, Unsold Traffic, 0-6 Mth Buying Pattern and 0-12 Mths to Expiry if any Salesperson is in a pinch and needs help hitting their monthly targets.
The Total Gross column is found between the Total Sold and Avg Gross, this Total Gross will help the user better understand how we are determining out Avg Gross calculations.
There is also an option in User Setup > User Access > Traffic Log > "Total Sales and Front End Gross" where a Manager can click on the Allow Access box for Total Sales and Front End Gross, this will give access to a Salesperson to view the Total Line or the Gross column in the Targets Screen.
The Lost column will show a list of customers that have been marked as lost on the Traffic Log. Click the number of lost to view a full list of customer names and details. (Customer Name, Entry Date, Salesperson, Traffic Type, Media, Vehicle Interest, Trade, Lost Reasons and Notes)
Use the calendar on the left to choose your month and year to view and the Targets screen will refresh with stats for the specified month/year. Filter by department and deals for new and used will separate accordingly. You can collapse the side menu to have a full screen view that is shown here.
2. Traffic Log/Leads Stats
In the Traffic Stats and Lead Stats > Prospects Summary we have changed the name from "# of Delivered DMS deals" to "# of Retail Deals (DMS)" and added a hover over stating "Excludes Wholesale and Fleet Deals" as now we will no longer included Wholesale and Fleet deals in # of Retail Deals (DMS).
Click the #of Retail Deals (DMS) (blue clickable link) to view the full list of sold deals for that time frame.
3. Workplan Report - Followup Analysis by Due Date
We have made a new report that will track what followups have been completed based on the initial due date of the task. This report has five different viewing options and will display the details in a consistent format clearly displaying how many followups were assigned, deleted, completed on time, completed past due and the overall percentage completed.
Here are the five viewing options:
By Assignee/Task Type
By Assignee/Booked By
By Booked By/By Assignee
By Task Type/By Assignee
By Task Type/By Booked By
4. Followup Groups
We have added the option of creating Followup Groups that can contain one or more Showroom users. The premise behind groups is a followup task can be assigned to a 'group' as opposed to being assigned to one person. This will allow the task to be completed by any one member of the group. Go to Showroom Configuration > Followup Groups to setup groups. Note: Only Showroom users can be added to a group.
5. Showroom Leads (duplicate leads)
As requested we have made the time limit to merger records customizable for the user. Now when in the Duplicated Lead scree in Showroom Lead you can change the number of Days that you would like to make as duplicate.
6. Google Calendar for Showroom Followups
In Showroom you now have the option of pushing scheduled followups to a google calendar. (Phone Call, Meeting, Test Drive, Lead etc) When viewing the google calendar the Task Reason will display in the title followed by the customer name and DM customer #. "Phone Call –Mary Banks - #12345" any comments entered when creating the Followup will also show in the description of the event. The steps are as follows:
Google Calendar Setup
In the Admin Screen click on Google Calendar Integration Setup
Choose the Store/Branch from the drop down
Click Grant Access
This will take you to the Authorize Google Account(s) page where you will see the Msg: “DealerMine has found the following calendars. Please ensure you have access to the corresponding calendars allowing DealerMine to push Calendar Events.” (make sure to check this)
Click on Authorize
You will be taken back to the Google Calenda rSetup screen, click on Load Calendars
A table will appear listing all Shwroom followup reasons that can be turned on for the calendar integration
Select the Followup Reasons and then click on the drop down for the Calendar IDs and choose the correct calendar
Click on the Event Calendar and enter the Title, Description, Location, Event Date and Time.
Save and close
You have an option of sending a test event to ensure the event does indeed push to the selected calendar.
Now that the user has set up their Google Calendar when they are in Traffic Log and create a Followup for a customer and use the same Followup reason as in the Google Calendar this Followup will be pushed to their Google Calendar. On the Calendar it will display the Reason, Customer name and DM number (Phone Call - Jim Smith - #12345) any comments entered will also in the description of the event.
To grant Access for a user for Google Calendar simply go to Admin Screen > Store Setup > User Setup, click on the User name and then click on the Google Calendar Allow Access box and Save.
Service & Showroom CRM
Resolutions
eService - eService will now only display the maintenance group name and not display the description/benefits of the service, since there is not enough space to neatly display this information without the user having to continuously scroll.
eService - we have changed the NEXT STEP button on eService to be more noticeable, this will make it easier for the users to see it and move to the next step in the booking process.
Recycle Codes -We have changed the way a user can Activate or Inactivate a Recycle Code in the Recycle Setup screen. Before when Activating or Inactivating a Recycle code the system would validate all the recycle codes on the grid for that particular Recycle Type (CSI, Maintenance, etc), now when Activating or Inactivating Recycle codes the system will only validate the Recycle Code that you're trying to Activate or Inactivate and will not validate the rest of the Recycle Codes on the grid.
Adding Vehicle - we have added a drop down in the Add Vehicle screen, the user will now will be able to click on the drop down list and choose the correct customer's file to add the vehicle to. This will be very helpful to the user when adding a vehicle to a Merged File.
Batch Emails and Letters - In Templates & Batch Setup > Batch Contacts > Email or Letter the “Send Time” will now default to 4am, the user will still be able to select a different send time by clicking on Scheduling and then choose a time. Also when Editing or Adding a new Batch Letter or Email we have change the title of the drop down “Maintenance Targets” to “Targets”, when Targets is set to N/A it will now show on the grid as “All” instead of the grid displaying blank.
Sales/Equity Schedules - We have made a change to allow users to recycle or final contact customers that call back after being recycled out on a sales schedule. Prior to this change when a customer was recycled out and then called back in, DealerMine wasn't always presenting the Sales indicator in the bottom left, therefore the schedule could not be final contacted or recycled. This has been fixed.