
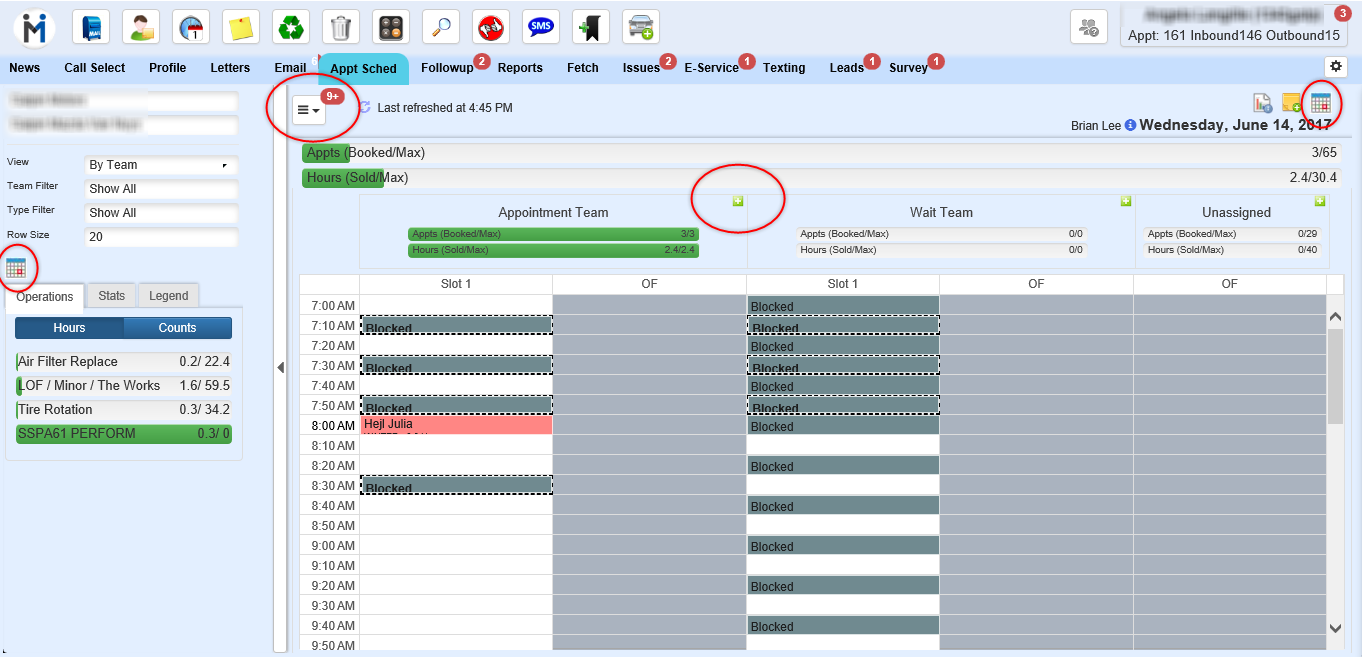
The Appointment Schedule gives Appointment Coordinators insight into the shops schedule for each store and branch. This at-a-glance view gives Appointment Coordinators the ability to see available time slots, view how many hours and appointments are currently booked for any date and time, as well as better manage shop capacity. The Appointment Schedule can be customized to mirror the shop setup in your DMS to book more effectively, dispersing waiters, avoid over booking etc.
Appointment Schedule
Appointment Schedule Quick Highlights
From the Appointment Schedule, our integrated dealerships can double click any available block to book an appointment for the customer file in view on the Profile tab. The current customer's name will be displayed in the top right of the screen, above the date.
Integrated dealerships can also edit any appointment by right clicking on any appt block and choosing "Edit".
Delete any appointment by right clicking on any appt block and choosing "Delete Appt".
View Appt Details by right clicking on any appt block and choosing "View Details". Details are also viewable when you choose "Edit". (available for non-integrated as well)
Click any service in the "Operations" list on the left side of the screen to view all corresponding appts that contain opcodes within that group.
Legend will give a breakdown based on the transportation type used on the appt to display how many Waiters, Drop Off's etc., are booked in on any given day. These colors can also be customized in Transportation Configuration.
Dealerships can customize the number of appt slots to display on the schedule, which is dictated primarily by the number of active Advisors setup. Slot columns labelled as Slot 1, Slot 2, Slot 3 etc., will display for all Advisors automatically, unless the option "Show on Schedule" is not checked off. See Advisor Setup > Specifications for more details.
Blocked time is always displayed on the left hand side of the schedule and is colored in Grey by default. This color can be customized in Transportation Configuration.
Click the Refresh button on the Appt Schedule to display the last time refreshed. Why use this? If the screen is not refreshed, it's possible to double book in a slot causing over-booking issues.
An overflow column labelled OF is always displayed as the last column on the right. This column will contain all overflow bookings when any time slot has exceeded the number of available appts. I.e. there are three slots for 8am but five appts have been booked. Two appts will appear in the OF column.
The Current Customer that is in view on the Customer Profile screen will be visible in the top right of the Appt Schedule screen. Click the arrow next to Current Customer to view the customer's: VIN, year, make, model and preferred advisor
NEW - Version 7.2 - Released June 8, 2017
Appointment Schedule Display Changes
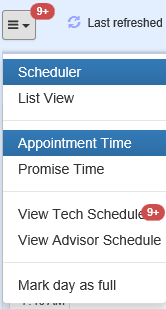
1. Calendar - We have removed the calendar that was always open on the left hand side. We've decided to change this to show two calendar buttons, one located on the left hand side and one above the date on the right hand side, shown circled below. Simply click the Calendar icon to choose any date or to Go to Today.
2. Team View Expansion - Now you can click the

to expand the Team into full screen mode for better viewing. Simply click the

to return to viewing All Teams.
3. Settings drop down - We have moved all contents from the Settings Drop Down menu into the menu next to the refresh button, shown here. This will now allow you to View Tech Schedules, View Advisor Schedules and Mark a Days a Full.
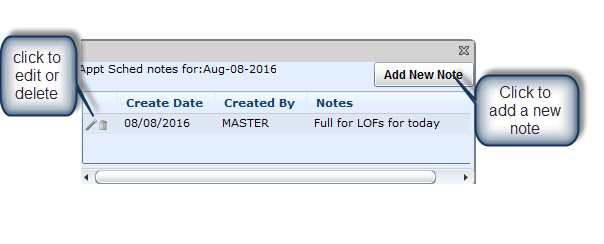
Notes
On the Appointment Scheduler a user can now create a note for any given day, the note screen will display when there is a note that will inform the users of
something important for that day. I.e. Limit morning appts for LOFs... A user can click on the Note icon and this will open the Add Notes screen where a user is able to add a new note or delete an existing one. Once a note exists for any date it will always default to the note being OPEN when on that date the user can click the X in the corner of the note screen to close at any time. In the Notes screen a user can Add, Edit, or Delete a note. At the top of the screen it will show what date the notes are for, and the Add New Note button, this will open a popup where the user can enter in the notes and Save. The Notes screen will display 3 headers
Create Date (date the note was created)
Created By (name of the person who created the note)
Notes (body of the note)

No Notes exist
Notes exist
