Any user can have access to add guests to the Traffic Log. By default Managers and Spotters have access and depending on your dealerships process Salespeople can add traffic as well.
If a Guest doesn't have a Customer or Prospect file, to add the guest to the Traffic Log, complete the following steps:
Click Add Guest (pencil and note pad icon on the top row of Action buttons).
Click the option Add Guest to Traffic Log.
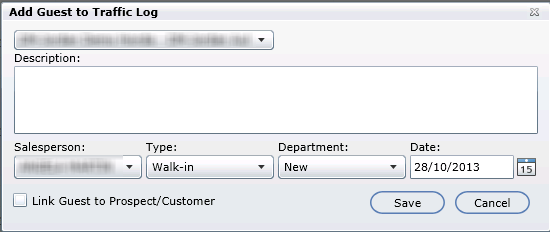
The Add Guest to Traffic Log screen is presented.
Key a description of the Guest.
If this guest is being assigned to someone (other than yourself), select the Salesperson drop down and click on the name.
Note: Only Sales Managers/Spotters by default are able to assign a guest to another Salesperson. Salespeople can also have access granted in the User Setup screen. See User Defaults
Click the drop down Type, and select how the guest was presented: i.e. Walk-in, Be Back, Call-in, or Internet Lead.
Click the drop down Department, and select New or Used
Key or select the Date from the calendar icon. Date defaults to the current day.
Select Save or Cancel.
The saved guest populates the Pending Guests tab; to view: click Traffic Log->Pending Guest.
Note: If the name of the prospect is known, or if there is already a file for the prospect on the Traffic Log, it's also possible to link the prospect directly from Add Guest to Traffic Log screen by checking the box Link Guest to Prospect/Customer. This feature allows the user to save a step by immediately linking the guest to a Prospect/Customer without the need to add the guest to the Pending Guests tab and then having to link the prospect. This feature isn't an option if from the Add Guest dropdown Add "CustomerName" to Traffic Log was the selection.
The tab Traffic Log and Pending Guests displays an orb indicating the number of Pending Guests up to a max of 9. Any amount will display 9+.
Complete the following steps if a Guest does have a Customer or Prospect file. :
From the file, click Add Guest.
Click the option Add "CustomerName" to Traffic Log.
Now follow the above steps: 3 to 11.

Note: the Type and Department options are added and updated through the configuration screen; to view: click Administration->Showroom Configuration->Traffic Log Types.
