
User Info
To view or edit users' information, from the User Setup window, select the User Info tab
Select the correlating drop downs to filter users by: Store, Branch, User Type and Status.
Select a user from the list box, and displayed on the right hand side of the screen are the user's details and when the user was last modified.
Dealermine users are created through the User Setup screen. For User Setup, employees are pulled from the DMS and linked to our Dealermine Users.
Not all DMS Employees are linked to Dealermine Users since not all DMS employees will be Dealermine Users. The permissions to book an appointment are setup on the DMS side. Dealermine can setup a user as a Service BDC user, but if the user's employee number isn't set up properly on the DMS side, the user will not be able to book an appointment. Dealermine Users must be linked to DMS Employees to book appointments. In the DMS, the linked Employee must have permissions to book appointments.
Appointments are pulled by DM, and those have the DMS employee ID or the "booker" associated with them. This ID is used by DM to look up the name in our listing we get from the DMS.
The name Advisor and Advisor ID might not correlate to the DMS definition of an Advisor. Note: Service BDC Users must be linked to a valid employee name/number to book appointments. Once the user info is setup and if the user is required to book appointments for other stores (other than their default store), go to the Store Access tab, select other stores the user may have access to, and place the cursor in the Employee# column, a drop down appears, click and select the appropriate Employee Name and Number. Click Save. The user can now book appointments.
Search field
For improved ease of use you can use the Search field anytime you're searching for a user, using any key word for your store/branch selection. It will search using any partial text entered and narrow down your search accordingly. If no match is found you will be notified via a pop up. This new feature will help admin users find existing users already setup, rather than having to scroll through and search active/inactive users.
Add a new User:
Click Add New User
Presented on the screen is the Add New User popup
Key in the user's:
Email Address. Note: in order to add the user, the email address must be valid; i.e. contains "@" and "."
Screen Name. Note: this is the name that is displayed in their name tab on the DealerMine screen and used in reports.
Use the default password populating the Password textbox or create a new one. Note: to force the user to change their password, click the Force Change Password checkbox.
Select the type of user from the User Type drop down
Select the Employee Name drop down to link the new user to their employee name and number. Note: before adding the user to the DealerMine system, their employee number must be setup in their DMS system. ("Also a Salesperson" option will become visible for Sales Managers/Spotter User Types. Check this option for Sales Managers to be included in the Salesperson drop down menus throughout the application; allowing them to organize their Workplan and be assigned Traffic) Any employee names in red are currently in use linked to another DealerMine user.
If the Employee Name is not found from the drop down, select Add Employee . Click Add Employee. A pop up is presented requiring DMS Empl # (the employee name populates if a match is found). If no match is found, the user enters the First and Last names, selects the Type of user and clicks SAVE. Note: Service BDC Users must be linked to a valid employee number to book appointments. If a Service BDC agent is added using this method, they won't have the ability to book appointments through DealerMine.
Key in the Work Number, Cell Number, Dealership Name, and Signature. Note: Admins can add two phone numbers to the Work Number field; for example: 1-888-650-3399 or 650-1234
Dealermine Email: select the email address that pertains to the Store and Branch. If nothing is selected, the user will not have email access.
Send the user an email with their logon and password by clicking Send Email.
Check the Is Active text box to activate the employee
Click Save
The user now displays in the employee list box on the User Info tab
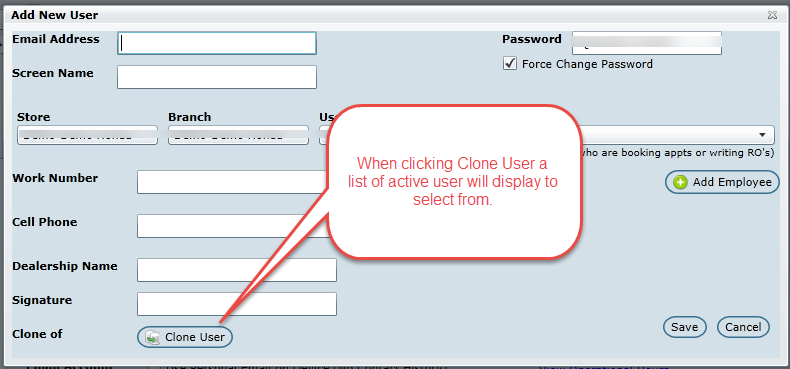
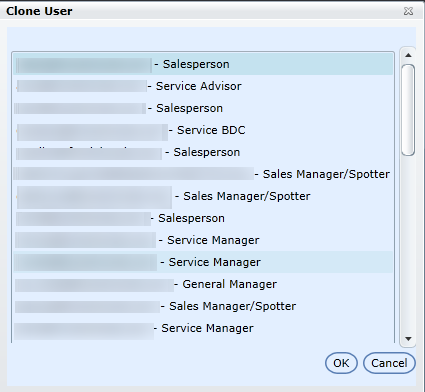
Clone User
To improve useability and productivity, we've added a cloning feature when setting up new users. Click "Add New User", followed by clicking the "Clone User" button to choose any user to clone. A list of active users will appear, allowing you to choose one to mirror for the setup. Cloning will provide the same the new user the same user access and settings as the user selected for the clone.
Enter in the Email Address and Screen Name as these are required fields
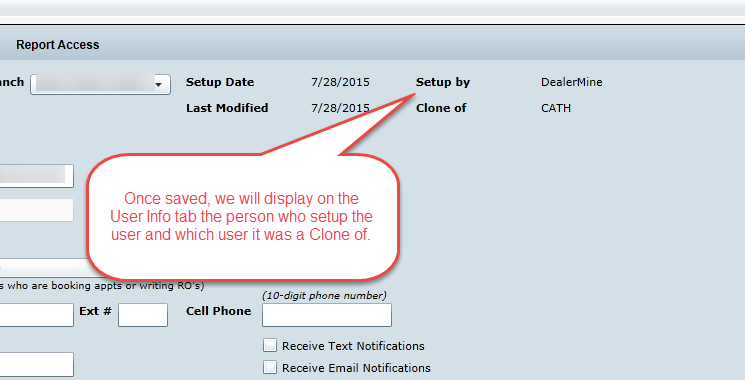
After saving you will be taken back to the User Info tab where DealerMine will display Setup by and Clone of for future referencing purposes.
Options for specific User Types:
Sales Manager/Spotter, check box Also a Salesperson comes into focus. This functionality is mainly for Showroom so the Sales Manager/Spotter will also display in the Salesperson drop downs allowing their sales actions to be observed. If the item is unchecked, the Sales Manager/Spotter doesn't show up in the Salesperson drop downs for Showroom. If the check box is checked, the Sales Manager/Spotter does appear.
Service/Showroom (Type 6), to have the user "Visible in Showroom Dropdowns" check the correlating box. This will ensure the Showroom BDC person can view their tasks in the Workplan.
Note about email: if the user has access to email and if an email inbox has been set up for each store or branch and user, the customer email response follows these priority rules: store inbox, user's default store, and then the user's inbox.
To Edit a User Name:
After an Employee is added, the Employee Name can be changed.
Click the Edit Name command button next to the Employee Name drop down.
Presented is the Alias Name popup; key in the Alias Name, and click Save.
The name now displayed on the Employee Name drop down is the saved Alias Name.
If it's required to change the name back to the original name, click the Edit Name command button once again, and click the radio button Use Original Name.
Click Save.
Update a User from the old Dealermine system to the new:
From the employee list box, click on a user in red (red indicates the user is still on the old system)
If the user is an administrator, click the Is Admin check box
Add the user's Email Address. Note: in order to add the user, the email address must be valid; i.e. contains "@" and "."
Screen Name stays the same as the old screen name, and it can't be changed. Note: this is the name that is displayed in their name tab on the DealerMine screen.
Key the user's Password. Note: to force the user to change their password, click the Force Change Password checkbox.
Select the Default Store and Branch
Select the User Type; i.e. Service BDC, General Manager, Service Advisor, etc
To link the employee to their Employee Name and work number, select the drop down. Note: this should already be populated with their information
Key the Work Number and Dealership Name
Dealermine Email: select the email address that pertains to the Store and Branch. If nothing is selected, the user will not have email access.
Check the Is Active text box to activate the employee