User Access will allow you to customize each user's own settings in DealerMine. We have basic settings per role (user type) which will automatically be set when each user is created. User Access allows an Admin user to modify any user's settings if required.
Highlight an employee name from the Employee list box and from the Options drop down, select:
1.DealerMine Access:
Select the DealerMine Access from the drop down; displayed are all screens, tabs, features that a user has access to use.
By default each user will have viewing access based on predetermined permissions based on our role access.
Turn on any screens, tabs or features for any user, followed by clicking Save.
When the employee logs into DealerMine, the product will show corresponding screens, tabs and features in which they've be given access to view.
DealerMine Access > Leads > "View All Leads". Any user that has access can be given access to view all leads regardless if they are assigned or unassigned. BDC Manager, Service Manager etc.
2.Call Select Contacts:
Displayed on the screen are all the call categories
Check the call types that are required for the employee
Click Save
The employee logs into DealermMne, and they only view the calls checked from this screen
3.Default Call Type:
Select the Call Types drop down; displayed on the screen are all the call types
Select the call type that will become the employee's default. For this example, Maintenance is selected.
Click Save
When the employee logs into DealerMine, Maintenance will be the call type highlighted on the Call Select screen
4.Default Store and Branch:
Select Store, and click the employee's default store
Select Branch, and click the employee's default branch
Click Save
When the employee logs into DealerMine, the screens are defaulted to the selected Store/Branch from this screen.
NEW - Version 7.3 – Released July 13, 2017
Show or Hide ALG on the Call Select and in the Recommended Maintenance list.
Go to User Setup > User Access > Call Select > Show_AvgGrs_Sales
If this option is checked users will continue to see the average gross per operation, whether it's on the Call Select or the Recommended Maintenance list per customer.
Granting Specific Access to New Features, Screens, Options and More
1. Equity Access Setup
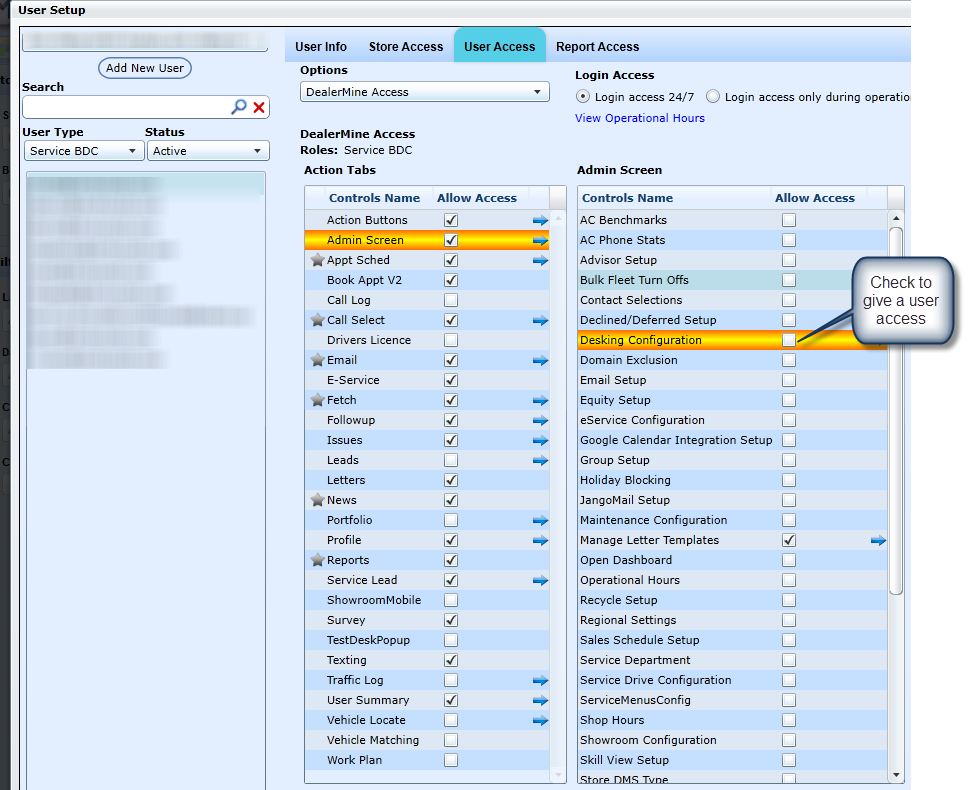
When in User Setup > User Access > Admin Screen > Equity Setup a user can be given access to Equity by placing a check in the Equity check box.
2. Delete Showroom Traffic Log Entries
Now a user can be given access to delete Showroom Traffic Log entries by placing a check in the Admin Screen > User Setup > User Access > Traffic Log > Delete Traffic check box. Now when on the Traffic Log > Pending Guest any user with access can delete an entry. Prior to this change all Showroom users had access to delete.
Note: By default this option will be on for the following user types: Sales Managers, Spotters, Salespeople, BDC Manager and Service/Sales BDC)
3. Resolution Emails for Issue Management
Now in User Setup>User Access>Issues we have added a "Resolution Email "check box, when checked off for a user they will received emails on all Issues that are resolved.
4. Adding a user to the "Email Online request" list (eService)
When in User Setup > User Access simply select the user that needs to showup in the Email Online Request list and then place a check in the E-Service check box and Save.
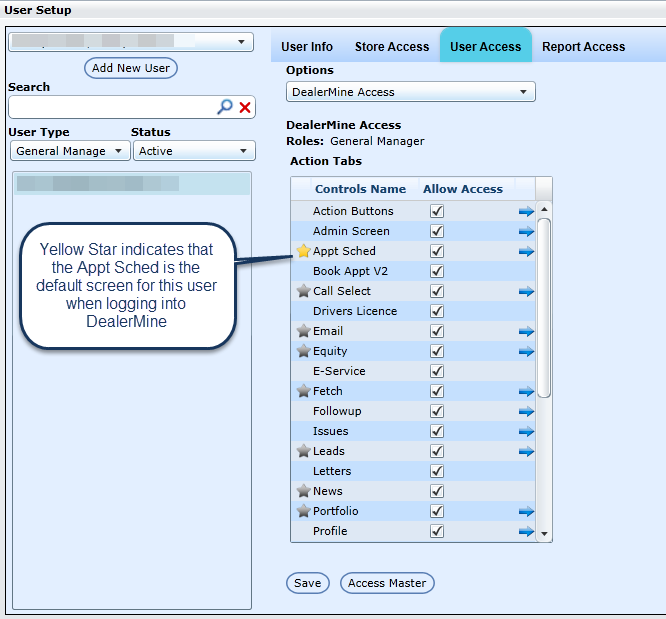
5. Setting a Users Default Screen Upon Login

When in User Setup>User Access options DealerMine Access a user can set their Default screen when logging into DealerMine by clicking on the greyed out Star beside the screen name they would like to be the default turning the Star yellow. After saving when the user logs into DealerMine they will go directly to the default screen they have selected saving them time.
* Some screens will not be available as a selection as all users must have access to the screen in order for it to be a default.
Type 1 General Manager - News, Call Select, Email, Appt Schedule, Reports, Fetch, Leads, Traffic Log, Equity, Portfolio, Workplan, Vehicle Matching
Type 2 Sales Manager/Spotter - News, Email, Reports, Fetch, Leads, Traffic Log, Equity, Portfolio, Workplan, Vehicle Matching
Type 3 Salesperson - News, Email, Leads, Traffic Log, Equity, Portfolio, Workplan, Vehicle Matching
Type 4 Service BDC - News, Call Select, Email, Appt Schedule, Reports, Fetch, Leads, Equity
Type 5 BDC Manager - News, Call Select, Email, Appt Schedule, Reports, Fetch, Leads, Traffic Log, Equity, Portfolio, Workplan, Vehicle Matching
Type 6 Service/Sales BDC - News, Call Select, Email, Appt Schedule, Reports, Fetch, Leads, Traffic Log, Equity, Portfolio, Workplan, Vehicle Matching
Type 7 Service Manager- News, Call Select, Email, Appt Schedule, Reports, Fetch, Leads, Service Drive, Equity
Type 8 Service Advisor - News, Email, Appt Schedule, Equity, Service Drive
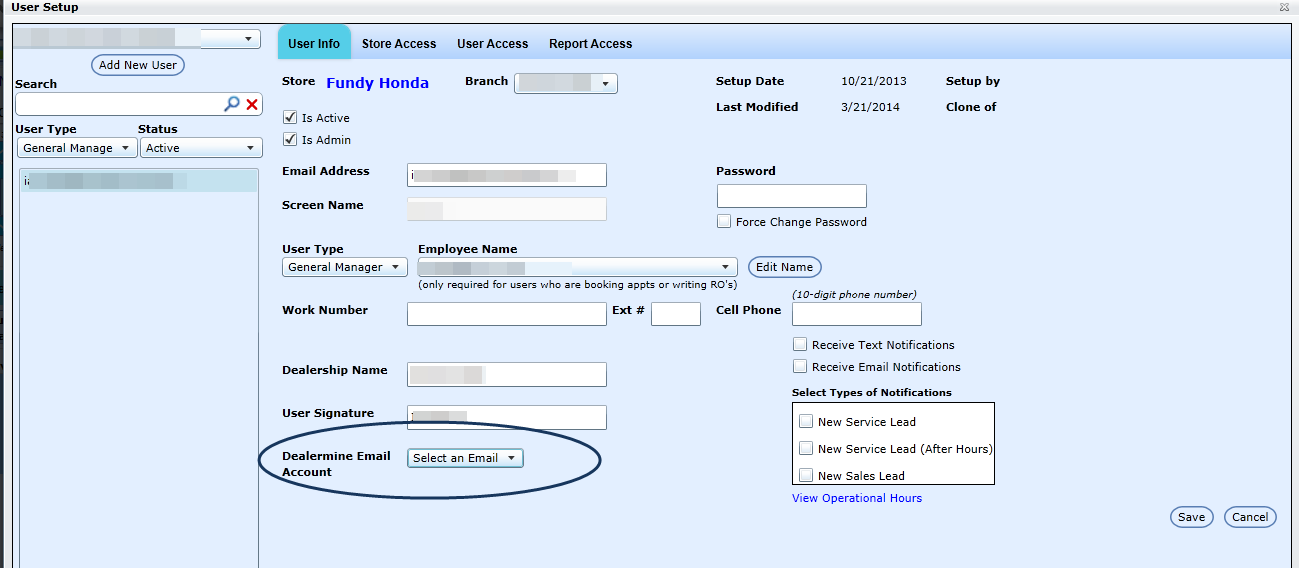
Note: When selecting the Email screen to be the default login screen, the user must first have a DealerMine Email Account selected on the User Info screen in order to set this as a default in User Access.
When clicking the Email Alert Access check box, this will place the user on the "Survey User Access" popup for selection on the Surveys Tab in Template & Batch Setup.

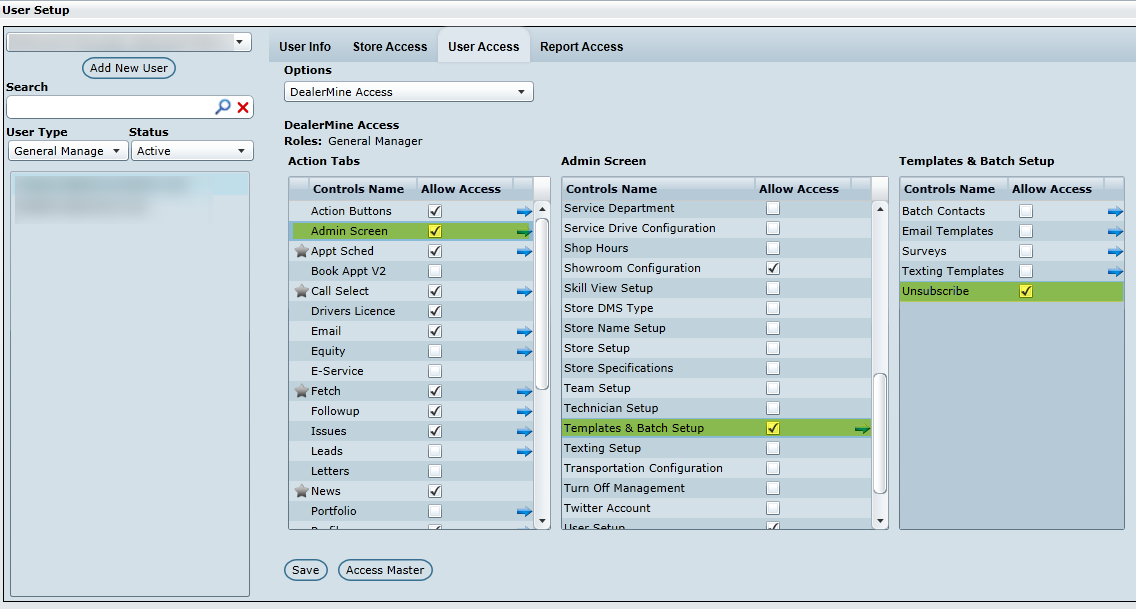
6.Unsubscribe tab
To give a user access to the Unsubscribe tab in Template & Batch Setup go into User Setup > User Access > Templates & Batch Setup > Unsubscribe and place a check in the check box.
Note: By default this will be on for all Admin Users.
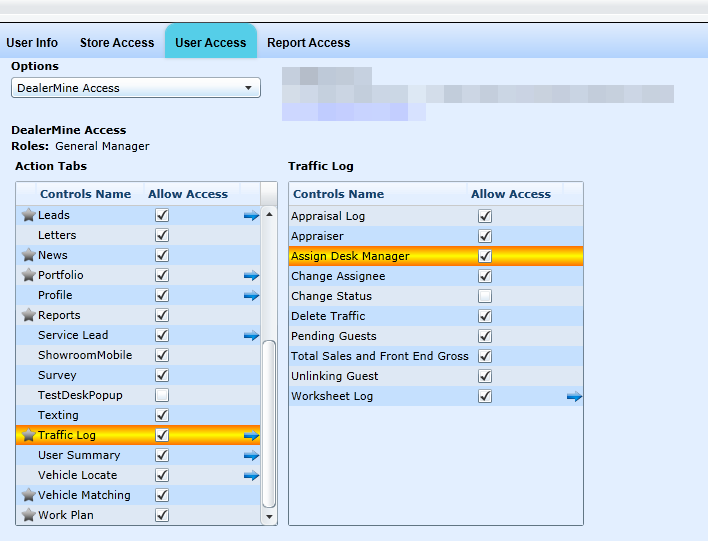
7. Assigning Desk Manager
Access now has to be given to a user to be able to Assign a Desk Manager when on the Desk Log, Pending Log, Traffic Log History from customer Profile, and from the Desking popup, user types 1 and 2 by default will have access. To give a user access to assign a Desk Manager go into User Setup > User Access > Traffic Log and place a check in the "Assign Desk Manager" check box. When a user has access they will be able to assign a Desk Manager from the Desk Log, Pending Log, Traffic Log History on customer Profile, and from the Desking popup.
8. Inventory Viewing Options
Based on the settings saved per user, a Dealership can control who has access to see New, Used or All inventory. In User Setup>User Access > Vehicle Locate we have added 3 new selection check boxes "View All Inventory, View Used Inventory and View New Inventory", here an Admin can grant access per user to view the inventory New, Used or All when clicking the Stock Link on the Worksheet or when in the Vehicle Located screen.
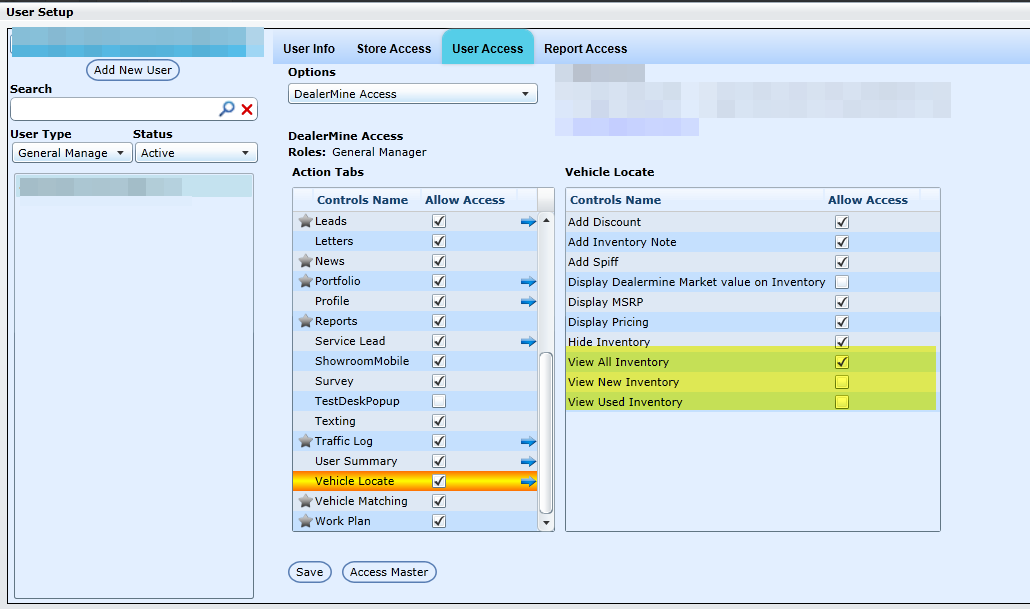
Note - by default "View All Inventory" will be selected
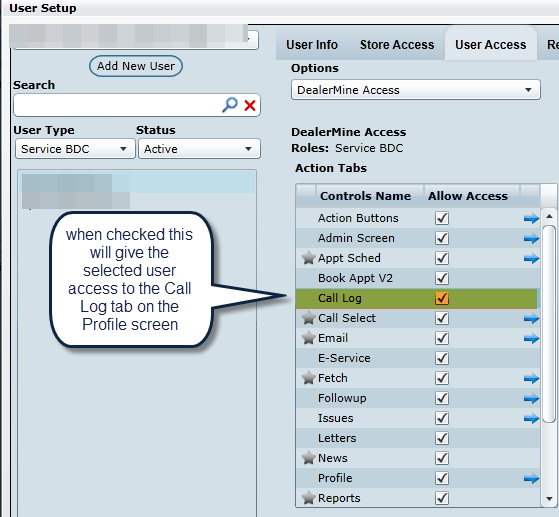
9. Call Log access
A user can be grated access to the Call Log tab by placing a check in the Call Log check box in User Setup > User Access > "Call Log", once this change is saved the user will now have access to view the Call Log tab.
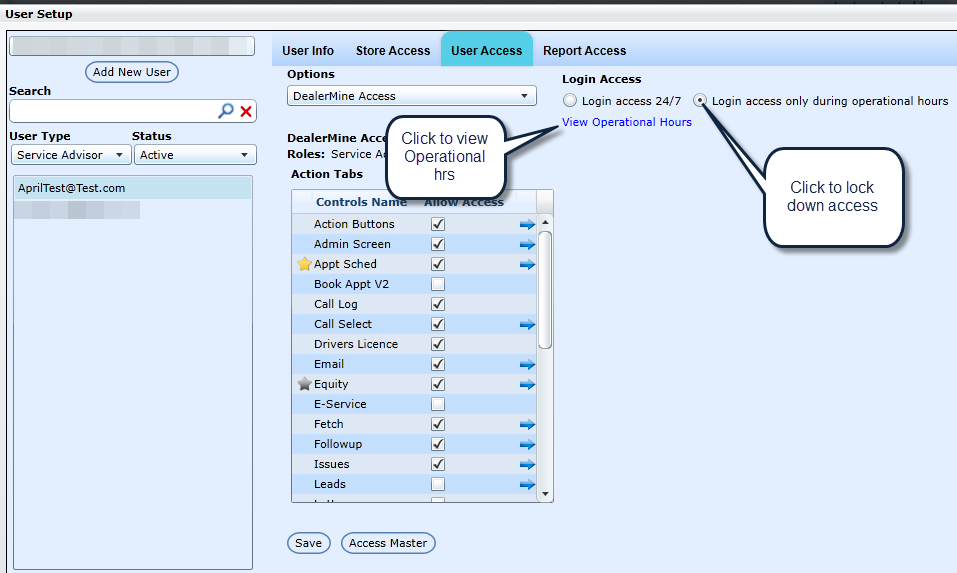
10. User Access based on Operational Hours
Now a Dealership has the option to lock down User access based on Operational hours. In User Setup > User Access > DealerMine Access there is a new radio button "Login access only during operational hours", when this radio button is selected for a user, that user will only be able to log into DealerMine during the hours set in Operational Hours.
For Type 1, 5 and 6 users the operational hours will be a combination of Service and Showroom, using the min and max hours.
For Type 2 use Showroom hours
For Type 3 use Showroom hours
For Type 4 use Service hours
For Type 7 use Service hours
For Type 8 use Service hours
*By default the radio button "Login access 24/7" will be selected
11.Telephony Access
To give a user access to the Telephony products an admin would go into User Setup > User Access > Admin Screen > Telephony Configuration and then another slide out will display with all the Telephony controls:
Call Queues - access to Admin by default
Caller ID Verification
Inbound Assist - access to Admin by default
Inbound Lines - access to Admin by default
Make Busy Reasons
Outbound Assist
Recycle Options
Telephony User - *this would be given to a user that is making Inbound and Outbound calls on Telephony
Users & Locations - access to Admin by default
Voice Files
NEW - Version 7.6 – Released
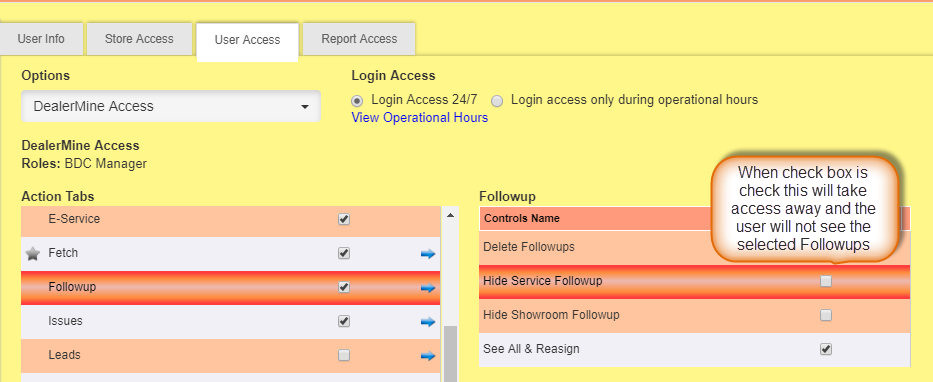
To take access away so a user cannot see either Service or Showroom Followups simply go to User Setup - User Access - Followups and then either check Hide Service Followup, Hide Showroom Followup or both. By default this options will be on so neither option will be checked.