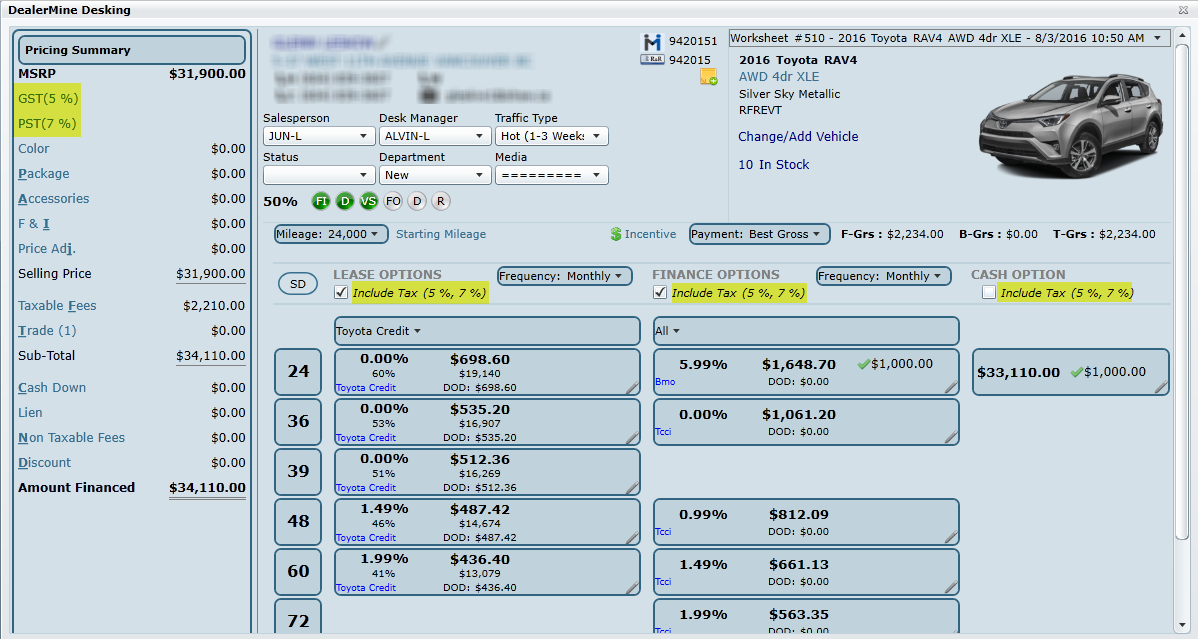
One-click Desking
Our one-click Desking screen opens automatically, displaying 15 + payment options instantly. Incentives can be automatically applied for lease, finance and cash or must be applied manually. From left to right the screen will layout the pricing summary, customer info etc., as explained in more detail below.
Expose Tax Rates
We are now exposing tax rates in the Desking screen at all times, rather than waiting until a deal is finalized. This clarity allows you to edit tax when needed and see what tax rates are being used in the payment matrix. Click the Tax Rates in the Pricing Summary to edit.

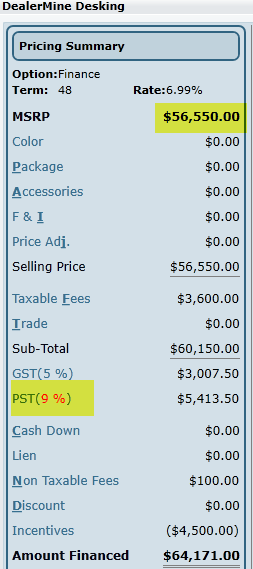
In British Columbia, Canada, there is a Luxury Tax which fluctuates the PST tax based on the price of the vehicle. When the PST is more then 7% it will display in RED on the Desking screen to indicate this automatic change based on the MSRP, color and package price. A user is able to manually change any tax rate percentage if needed.$54,999 or less is 7%
$55,000 - $55,999 is 8%
$56,000 - $56,999 is 9%
$57,000 and up is 10%
The Luxury Tax PST is now determined using the following calculation:
MSRP + color cost + package price
If this amount is greater than $54,999.99 it will automatically bump up to the appropriate PST rate. (Luxury Tax)

How are taxes calculated on a lease with a Trade In? (British Columbia only)
The PST will be based on the original selling price of the vehicle, before Trade In when a customer is leasing a vehicle. Please refer to this page.

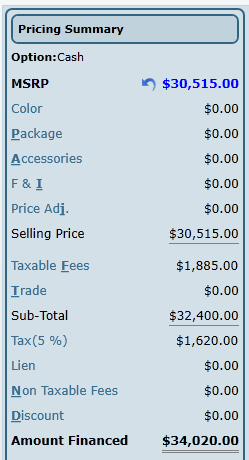
1. Pricing Summary

Refresh
We have added a "Refesh" button on the Pricing Summary ribbon. Click Refresh anytime to bring back new payments, incentives, lenders etc., if at anytime the MSRP is changed.
MSRP
The MSRP is displayed at the top of the pricing summary and can be edited when clicked. When changed the MSRP will turn blue with an icon next to it. Click the undo arrow to revert back to the original MSRP value.
Color
Click the line and a pop up will appear showing you all the color options available for the selected vehicle. The cost will be listed as well since some premium paints are at an additional expense.
Package
Click the line and a pop up will appear showing you all the package options available for the selected vehicle.
Accessories
Click the line and a pop up will appear allowing you to select any OEM Accessories and/or add any Dealer Accessories. Right click to Edit any accessory line, whether it's OEM or Dealer. You can adjust the price, cost and check off if it's a residualizable accessory and add it to Due on Delivery (DOD).

Why Residualize Accessories?
Some value-added accessories will increase the future value of a vehicle, such as: Chrome wheels, Headrest DVD system, Bedliners and Bed Rests, Rear Spoiler, Power Sunroof.
F & I
Finance and Insurance products can be setup to be added to any deal before the customer arrives in the Business Office. This is an optional section which can be used by any dealership. Click the line and check off any product, edit any MSRP or Cost and even add to Due on Delivery if needed (DOD).

Add products on the fly by clicking the Add button at the top of the screen.
Price Adj.
Click the line to add any price adjustments to the deal. You can add one or more, with their own descriptions and amounts. The sum of all price adjustments will be visible on the Price Adj. line of the printed Worksheet. Price adjustments are applied before tax.
Selling Price
The selling price is the sum of all lines above it. MSRP + Color + Package + Accessories + F & I - Price Adjustments = Selling Price. You can also edit the Selling Price quickly and easily. When edited we will automatically add a price adjustment for the difference between the new selling price and the MSRP. Click the blue arrow anytime to revert back to original selling price.
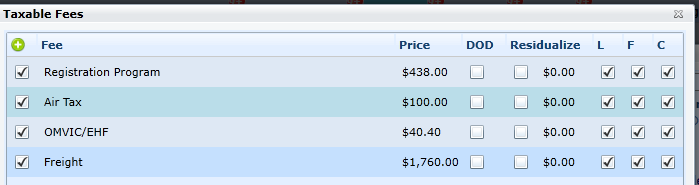
Taxable Fees
Click the line to add or adjust any auto added Taxable Fees. Taxable Fees are setup in Showroom Configuration - Worksheet Items - Misc Fees/Items.
Any taxable fees can also be added to Due on Delivery (DOD) and flagged to be Residualized if applicable.
Version 6.4.1 – Released Aug 17, 2016
When in the Desking screen a user with access is able to select if they would like to add a Taxable Fee to a "Cash" deal after it has been finalized. When clicking on the Taxable Fees in the Pricing Summary section of the Desking screen a "C" (Cash) check box has been added to the Taxable Fees popup.

Trade
Click the line to either Add or view an already inputted Trade. The trade value will be displayed on the line in the Pricing Summary. If in (parentheses) it will be subtracted from the selling price and the Sub-Total will be reduced. You have the ability to quickly add a Trade(s) to any deal by entering a VIN, using an existing vehicle on file, manual entry or a list. Once a trade is added you choose the correct Trim and Style, enter mileage, estimated trade value, any reconditioning fees, amount owing, and lien holder information. You can also check if this vehicle is a lease return.
We have made improvements to viewing a Trade after it's been entered.
Year, Make, Model, Trim and Style - will display under "Vehicle Details"
Mileage - will now display KMS or Miles
Trade Value, Recon Fee (reconditioning fee), A.C.V (actual cash value), Amount Owed and Net Trade - will all display under "Valuation"
Option to flag as Lease Return
Option to Include in Front Gross
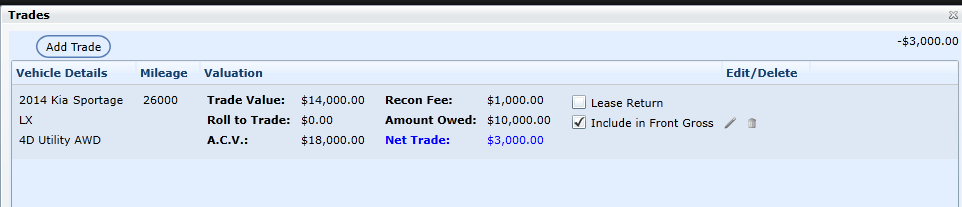

Why Flag as a Lease Return?
On a lease return there is no lien, we use the trade value less any outstanding payments to determine the Net Trade. This amount will be added to the selling price of the new deal. Nothing is added under Lien, as it would normally be for trades not flagged as a lease return. Customers receive a tax break on liens, and since the customer only paid tax each month during the lease they do not get a tax break on the remaining amount since taxes were not paid in full upfront.

Why include Trade in Front Gross?
If you choose to include the Trade in the Front Gross it will have a direct impact on the Front Gross. We use the A.C.V - (Trade Value + Roll to Trade) to determine the impact it will have. This basically shows what the Front Gross is if the vehicle sells for that amount once included in used inventory. Click the Front Gross to view the breakdown and from this screen you can adjust the A.C.V of the Trade in the MSRP column.
Sub-Total
This is the sum of the Selling Price + Taxable Fees +/- Trade. Tax is not included in the Sub-Total. Once a payment is finalized Tax owing will display under this line.
Cash Down
Click the line to add Cash Down to any deal. Cash Down can be applied to "Finance Cash Down" or "Lease Cash Down".
This popup will also clearly indicate the Cash Down tax calculation and the user can select to Back out Tax by checking the "Back Out Tax" check box, which will only affect the Lease payments.
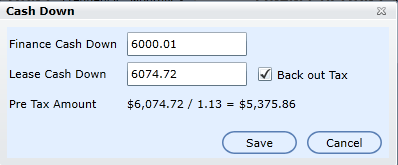

Why do we need a Finance Cash Down and a Lease Cash Down?
This is a great option to have so you can quickly compare finance and lease payments using different cash down values. Ie. $2000 finance cash down and nothing down on a lease would allow you to compare the differences quickly.

What are the shortcomings of paying cash down on a lease?
Cash down on a lease is not a deposit but simply a way of pre-paying part of the lease to reduce the monthly payment amount. This means that tax is still due on the cash down, whether it's paid upfront on Due on Delivery or added to the total amount financed. Dealerships have the option of backing out the tax or adding it to Due on Delivery.

Why Back out the Tax? (Leases only)
On leases there are times you may want to back out tax on cash down or incentives. By backing out the tax it keeps the due on delivery costs lower for the customer. Cash down or incentives are taxable items so it's more convenient for the dealership to back the tax out.
I.e. $2000 cash down would be $1770 + $230 (13% tax), or the customer would pay $230 due on delivery.
Note: You can also Back out the Tax on any Discounts added as well.
2. Customer Info, Traffic Info, Sales Steps
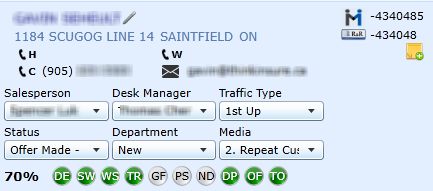
Customer Name - click name to view Customer Profile - click pencil to edit customer information
Address, Phone numbers and email will be visible if they have been entered in customer information.
Desk Log fields: Salesperson, Desk Manager Traffic Type, Status, Department and Media are visible and can be updated.
Sales Steps are visible and can also be updated
The DealerMine customer # and DMS customer # will be visible on this screen.
The Deal # (if a deal has been finalized and pushed) will display under DMS cust #
Notes - click the Add Notes button to add a note on any deal. This will be printed on the Deal Summary.
Version 6.2 – Released June 23, 2016
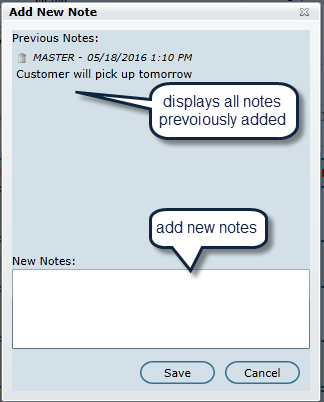
Notes in Desking
A "Notes" icon has been added to the Desking screen, here a user is able to added a note by clicking the icon , then the "Add New Notes"popup will display where the user can add Notes and Save. Once saved the Notes icon will change displaying "Notes" underlined and in green, when clicked a popup will display showing all notes previously entered along with a Date/Time stamped, and the name of the user that added the notes . To delete any notes simply click on the Trash next to the Notes you wish to delete within the Add New Notes popup, the screen will resize and the user is able to add Notes and Save. The Notes will also show on the printed Deal Summary sheet.* Note only a Desk Manager is able to delete Notes in the Desking screen.


3. Vehicle Details
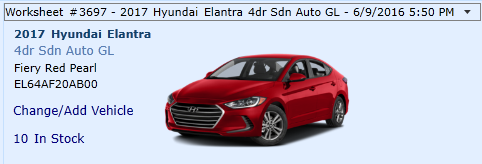
The Worksheet # will appear in the top right, along with vehicle details and date/time it was saved. (If there is more than one saved Worksheet there will be a drop down)
A vehicle image will be displayed, along with the year, make, model, trim, style, color and model code.
The VIN can be copied if needed, simply double click the VIN to select all text.
The Change/Add Vehicle link allows you to go back to the Worksheet Entry screen and choose a different vehicle. When doing this a new worksheet # will be generated and saved under the Worksheet drop down.
# In Stock link allows you to quickly view all in-stock vehicles that match the vehicle interest. At this point a vehicle can be selected from inventory by clicking the star. This stock # will now be present on the Desking Screen.
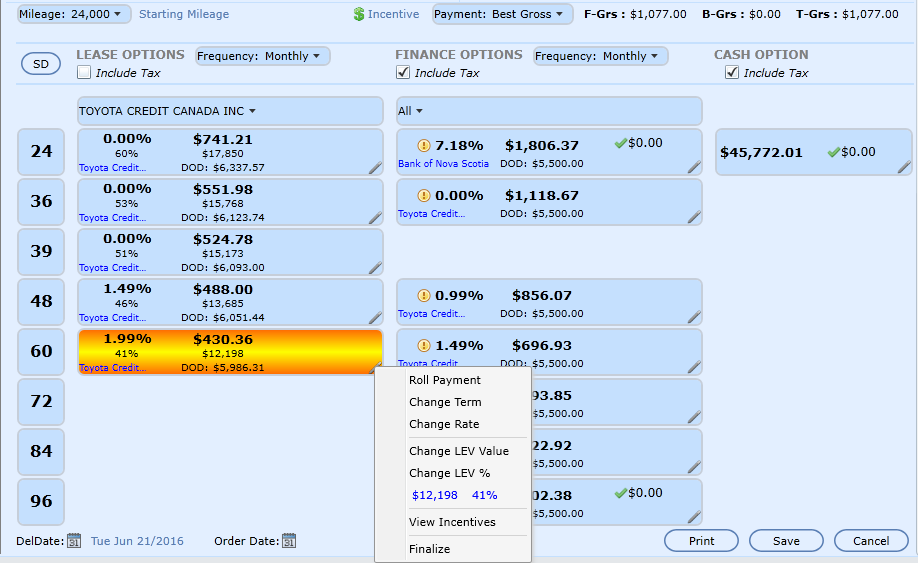
4. Payment Matrix
From left to right the matrix will load all payments listed by Terms for lease and finance, followed by the cash option. Each payment section will have an option to Include Tax. If checked all payments in that section will include tax, if unchecked no tax is included. It's common to present lease payments excluding tax and finance payments with tax.
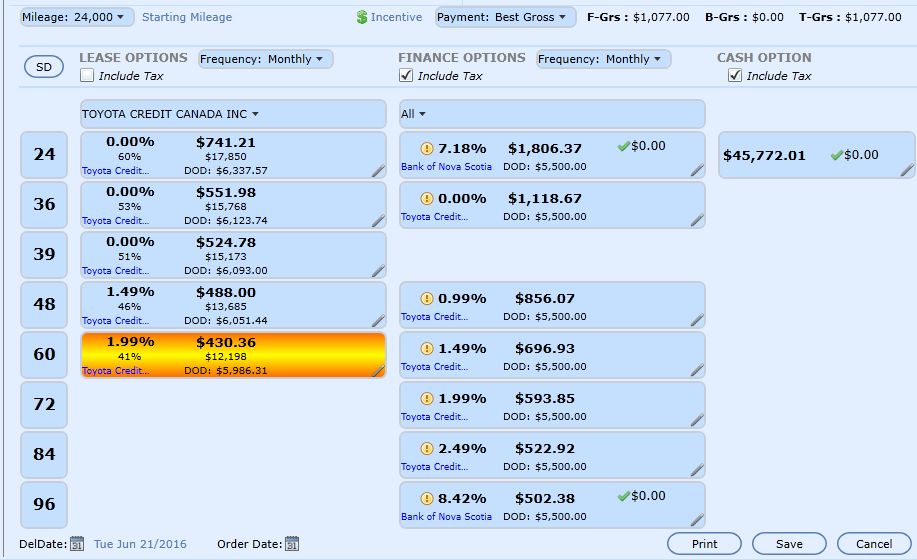
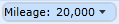
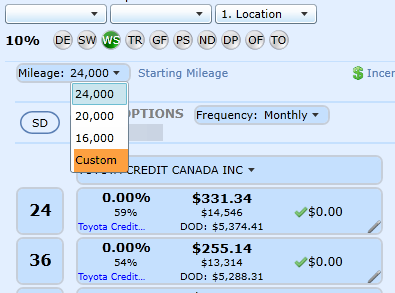
Use the Mileage Allowance drop down to choose a mileage allowance or enter a custom one for leasing. All mileage options available will display. Payments will refresh automatically when selected.
Custom Mileage
When in the Desking screen a user can enter in a custom mileage by simply clicking on the Mileage drop down and selecting "Custom". When Custom is selected the Excess Mileage popup will display and the user can enter in a Custom mileage in the Mileage Per Year box, Upfront Fee and save. When the popup closes the custom mileage will display and will also update the Payments, DOD and LEV. The system will only allow a user to enter custom mileages when they're able. Most times you must exceed the existing mileage allowwances first in order to create a custom. Ie. 25,000 km a year would be available since it exceeds 24,000 kms, but 23,000 kms a year wouldn't be allowed.
Starting Mileage - When a customer is Leasing a vehicle which was a demo with mileage the Salesperson/Sales Manager are now able to enter the Starting Mileage on the vehicle by clicking on the "Starting Mileage" link. The Starting Mileage popup will appear where the user can enter the Starting Mileage and the Upfront Fee. The Total will display the cost of the starting mileage which will increase the amount on the Payment and Due on Delivery, and decrease the LEV (lease end value). Once saved the Starting Mileage will display on the Desking screen by the Starting mileage link, and will also display on the Deal Summary when printed.
F-Grs/B-Grs/T-Grs
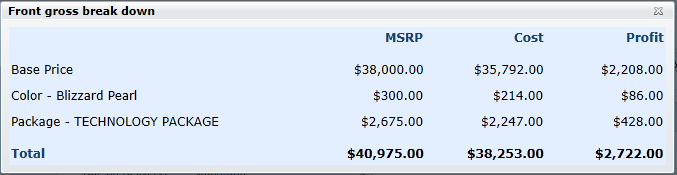
The front gross, back gross and total gross will be visible at all times on the Desking screen. The front gross is determined by the inventory cost - selling price. Back gross will increase after the deal has been sold and passed off to the Business office to upsell F & I.
Click the F-Grs to display a breakdown screen. This popup will give a break down of the Front Gross, the user will also be able to edit the MSRP and the Cost columns, when a change has been made the Profit column will update automatically. When closed the new values entered will display on the Desking screen.
Incentive

Incentives
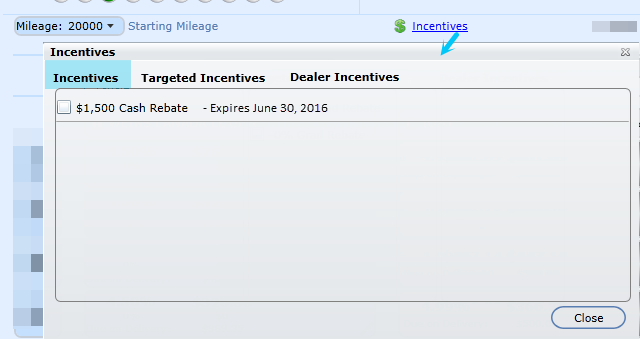
The incentive link allows you to view all incentives available, rather than having to do it on each payment. The popup will display three tabs as follows: Incentives, Targeted Incentives and Dealer Incentives. When selecting or unselecting an Incentive it will reflect on the payments displayed in the payment matrix. The Expiry Date will also be displayed in the Incentives screen, next to each incentive.
Targeted Incentives
The Loyalty Bonus will now show as a Targeted Incentive. (The Managers can check this off if the customer qualifies) When the Loyalty bonus is checked off it will be applied to all the payments on the Payment grid with an original rate of .25% or higher based on the example shown below.
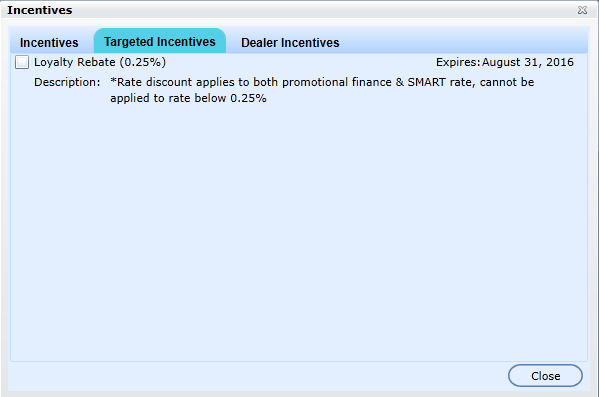
*Loyalty bonus will only be applied to rates that are >/= 0.25%
Sort Options

You can sort the payments or view them based on the following options:
Best Gross
Best Payment
Best Rate
Best Incentive
Click on Pencil on any Payment for more options
Click on the pencil on any payment to view the following options:Roll Payment
Change Term
Change Rate
Change LEV Value (Lease only)
Change LEV % (Lease only)
View Incentives
Finalize

What does it mean to Roll Payment?
When a customer's desired payment is below what their current payment is at in the deal a Desk Manager will attempt to roll the payment. The desk manager has the option to roll the payment to one of three fields that would adjust in order to lower the payment to the desired amount. Ie. Trade value, Gross or Selling price.

When should I Finalize a payment?
When you're customer has made a final payment selection and you're ready to finalize a deal, simply right click and choose Finalize on the chosen payment. The payment will outline in yellow and the Pricing Summary will show more detail at the bottom of the screen as follows:
Cost of Borrowing
Due on Delivery
Payment
Tax (will be shown on leases)
Total Payment
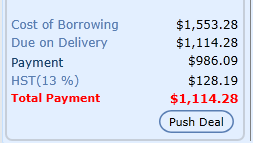

When can I Push Deal?
If bi-directional integration exists to push deals you can Push Deal and a deal # will be generated and displayed on the top of the screen. The deal structure will push over to the DMS for the FSM to complete the deal.

How is Cost of Borrowing Calculated?
This calculation is quite simple. Based on the interest rate we calculate how much they will spend over the life of the term and subtract from that the same payment with a 0% rate. This will give the cost of borrowing for lease and finance. Obviously the lower the rate, the lower the cost of borrowing.
Lease/Finance Formula
1.99 % Rate
60 month Term
Monthly payment is $486.31
486.31 x 60 = $29,178.60
With 0% interest
Monthly payment is $441.48
441.48 x 60 = $26,488.80
Cost of Borrowing is $29,178.60 - $26,488.80 = $2,689.80

Flag for Expired Offers
A red icon will appear on any payment that is now expired for one reason or another. Hover over the icon to view possible reasons, or click the pencil to view Incentives.
On the Incentive popup we will display the icon next to expired incentive that are no longer available.
For the Cash option the Flag will only display in the Payment's option when one or more expired Incentives is selected in the Incentive popup.
For Finance/Lease option the Flag will only display in the payment option if one or more expired incentives was/is selected in the Incentive popup, or the Payment option is not available or has changed since the saved date.
A hover over will display a message
Payment options are no longer available
Program has expired
One or more Incentives are invalid
Please review “Incentives” for more details
Version 6.4 – Released Aug 4, 2016
Expired Icon in Rate popup
When a Payment selection has expired DealerMine will display the Expired icon on the Desking screen next to a Payment, the user will then click on the Yellow icon and the Rate popup will display and the Expired icon next to the Payment that is expired.


How can I update my quote and see valid payments?
Typically you can expect to see the expired icon when looking at quotes from a previous month, where the incentives may have changed. Use the Refresh button at the top of the Pricing Summary at any time to get new rates/offers.
Go to Lease Options
Go to Finance & Cash Options